How to Brew the Perfect Pour-Over Coffee at Home: A Step-by-Step Guide for Beginners
Pour-over coffee has a reputation for being fussy. The truth is, once you understand a few basic principles, it's one of the most straightforward brewing methods you can learn. And the results are worth it. A good pour-over is clean, bright, and full of flavor in a way that most other methods just can't match.
This guide walks you through everything you need to get started, even if you've never brewed pour-over before.
What Makes Pour-Over Different
Pour-over is a manual brewing method. Hot water flows through ground coffee and a paper filter, dripping into a cup or carafe below. Because you control the pour, you control the extraction. That's the whole idea.
Compared to a drip machine, pour-over gives you more say over how the coffee tastes. Slow down the pour and you get more extraction. Speed it up and you get less. Once you get the hang of it, that control becomes second nature.
What You'll Need
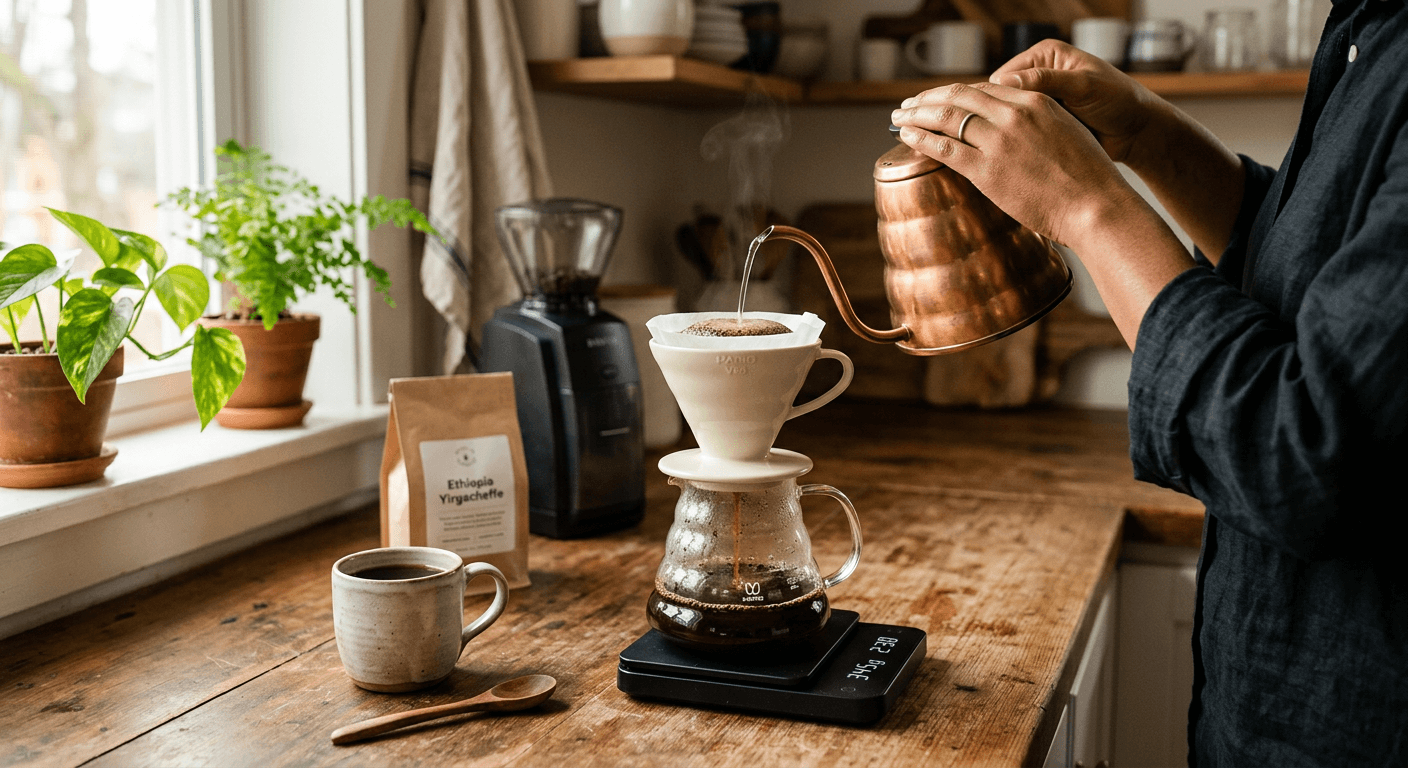
- A pour-over dripper (Hario V60, Chemex, and Kalita Wave are popular options for beginners)
- Paper filters that fit your dripper
- Freshly ground coffee (medium to medium-fine grind)
- A gooseneck kettle (the narrow spout gives you much better control over your pour)
- A digital scale
- A timer
- A mug or carafe
You don't need the most expensive gear to brew great coffee. A basic gooseneck kettle and a simple dripper will take you a long way.
Start With Good Coffee
The beans matter more than anything else. Fresh, quality coffee makes a noticeable difference in the cup. Look for beans with a roast date on the bag, and aim to use them within two to four weeks of that date.
For pour-over, a light to medium roast tends to work really well. These roast levels highlight the natural flavors in the bean, whether that's fruit, florals, chocolate, or nuts. A darker roast can work too, but you may find the flavor a bit flatter through this method.
Grind your coffee fresh if you can. Pre-ground coffee goes stale quickly, and the grind size matters a lot for pour-over. A burr grinder gives you a consistent grind, which leads to more even extraction.
The Right Ratio
A good starting point is 1 gram of coffee for every 16 grams of water. For a standard 300ml cup, that's about 18 to 19 grams of coffee. Use your scale every time, at least while you're learning. Small changes in ratio have a real impact on taste.
If your coffee tastes weak, try using a bit more coffee or slowing your pour. If it tastes bitter or harsh, try slightly less coffee or a coarser grind.
Step-by-Step Brew Guide
Once you've got your gear and coffee ready, here's how to put it all together.
- Step 1 – Heat your water. Aim for around 93°C (200°F). If you don't have a thermometer, bring the water to a boil and let it sit for 30 seconds.
- Step 2 – Rinse the filter. Place the filter in your dripper and pour hot water through it. This removes any paper taste and warms up the dripper. Discard the rinse water.
- Step 3 – Add your coffee. Add your ground coffee to the filter and give it a gentle shake to level the bed.
- Step 4 – The bloom. Start your timer. Pour just enough water to saturate all the grounds, roughly twice the weight of your coffee. So for 18g of coffee, pour about 36g of water. Wait 30 to 45 seconds. This lets CO2 escape from fresh coffee, which helps with even extraction.
- Step 5 – Continue pouring. Pour slowly in small circles, starting from the center and working outward. Keep the water level steady, don't let it run dry between pours. Pour in stages if that helps you stay controlled.
- Step 6 – Finish the brew. The total brew time for a 300ml cup should be around 2.5 to 3.5 minutes. If it's draining much faster or slower, adjust your grind size next time.
Dialing In Your Grind
Grind size is the most useful thing to adjust once you've got the basics down. If your brew is draining too slowly and tastes bitter, go a bit coarser. If it drains too fast and tastes weak or sour, go finer.
Small changes make a real difference. Most grinders adjust in small steps, so move one or two steps at a time and taste as you go.
Common Mistakes to Avoid
- Skipping the bloom. It only takes 30 seconds and it genuinely improves extraction.
- Pouring too fast. A rushed pour means uneven extraction. Take your time.
- Using old coffee. Stale beans won't taste good no matter how carefully you brew.
- Ignoring water temperature. Water that's too hot can over-extract. Water that's too cool under-extracts. Aim for that sweet spot around 93°C.
- Not rinsing the filter. It's a small step, but paper taste in your cup is noticeable.
Why the Process Is Worth It
Pour-over takes a few more minutes than hitting a button on a machine. But there's something satisfying about making coffee this way. You're paying attention to what you're doing, and the results reflect that.
It's also a great way to actually taste the coffee you're buying. When you slow down the process, you start to notice what makes one bean different from another. That curiosity is part of what makes specialty coffee interesting.
At Diving Moose Coffee, we source coffees that are worth that kind of attention. And every bag you buy supports wildlife conservation through our partnership with WWF. Good coffee and a good cause tend to go well together.
Start simple, be consistent, and adjust one thing at a time. You'll be surprised how quickly it clicks.
Dennis Laube is the founder of Diving Moose Coffee, a specialty coffee roastery in Thomasville, Georgia. Every coffee he writes about is roasted on demand on the company's own Ambex roaster and shipped within 48 hours.